Do you want to subscribe?
Subscribe today.
Cancel SubscribeWhen you open this pub again using this browser, you'll be returned to this page. When you move to the next page the bookmark will be moved to that page (if you move back the bookmark will remain on the furthest page to which you've read). By touching the bookmark you can set the bookmark to whichever page you are on.
More bookmark features coming soon.
You must login to publish and add your own notes. Eventually you will be able to see others contributions if they make them public.
More notes features coming soon.
Building with straw bale changes everything. This natural renewable insulation material is superior to conventional insulation. If you are thinking of building, renovating or doing an addition on your home or business then make sure you include some straw bale. It may sound strange at first, but once you read more, work with straw and begin to realize how much sense it makes, you will be forever transformed.
Before you begin any work read this entire article and consult with building experts. Some of the tasks require substantial preparation. Other tasks should be practiced or experimented with in advance of the actual construction days. These instructions are best supplemented with hands on workshop experience or volunteering for a straw bale home building project, and books on the topic. For more information see the Products and Services section at the end of this article.
First of all, you need to get comfortable with the idea of building with straw. I know when I first heard about the concept I was exceptionally skeptical despite a strong desire to build sustainably. My gut instinct told me that perhaps it would rot or catch on fire too easily. I have a family, and despite my strong desire to create a sustainable future for my children, it would not be worth taking additional risks. So I began to read every book I could find on the subject.
Surely the three little pigs taught us that straw was not the right material to use. It would just blow away, rot or burn…wouldn’t it?
Is straw bale strong enough? Yes, in fact it’s stronger than most other building techniques since it has some “give”. Rather than crumbling in an earthquake, for instance, the system, like a tree, is able to dampen the shock, bend, while not being rigid and crumbling. It won’t blow away because the simple construction system sews the bales into place, weaving natural fibers together with steel wire fencing, and rock solid posts and beams. In fact these homes have proven capable of lasting almost a hundred years even in difficult climates like Nebraska. Even in the humid southern state of Alabama, a large straw bale mansion has withstood the test of time since the fifties.
Also keep in mind that straw bale and straw/mud homes are still built and used all over the world. They are a sensible design that has evolved over thousands of years of trial and error. Although we may be less familiar with the comfort, safety and longevity of these wonderful homes, people all over the world are building with straw bales, relearning ancient techniques and combining them with modern tools, materials and designs. As my wife Leigh says, keep an open mind.
So what is so great about straw bale? Where to start? There are so many things about building with straw bale that I’ve learned and that have convinced me that it is one of the most sensible, cost effective and sustainable systems ever to have evolved. The benefits also exist at all levels from design flexibility, ease of construction, health, safety and sustainability.
First of all, straw is in general an inexpensive, renewable building/insulation material available in pretty much all parts of the world in one form or another. Being a local and renewable building material that is inexpensive makes it worth a good hard look. There are different types of straw such as wheat-based or rice-based. Similar to straw is hemp, another potential renewable building/ insulation material. Cob is another farm product that can be used to build in a similar way. The beauty of these materials is that they grow back each year so we aren’t cutting down old growth forests or using up large amounts of fossil fuel based energy supplies to create conventional insulation materials like fiber glass or “Roxul” (volcanic rock with steel slag). Also, the cost of straw insulation is less than commercial insulation materials while the insulation values are better.
The other critical benefit of straw bale walls is their ability the “breathe”. This ability, despite superior insulation levels, provides improved air quality. You’ve no doubt heard about “sick building” syndrome. You’re probably aware of the molds, mildews and fungus growing in homes. Well, incorporating breathing walls can prevent all of this. Breathing walls also react to changes in climate much better than modern methods of sealing a home and then trying to mechanically ventilate it, not to mention the additional energy costs to do so.
Just imagine our modern homes, R2000, or conventional housing development homes built to Canadian “standards”. These home are essentially sealed up in plastic and then a heat recovery ventilator (HRV) tries to mechanically refresh the air from the outdoors at a specific rate.
Unfortunately these systems don’t work that well. In most such sealed homes there is a very real and common problem of molds, mildews and fungus growing in your walls. This is most frequently caused by the condensation of water on the inside of the vapor barriers, mandated by R2000 or general building codes. So the sealed home works well in the winter by insulating and preventing air from blowing into the home. However, this design does not react well to warm humid summers. Instead, in the summer especially, these conventional homes will be susceptible to condensation. Combined with air conditioning and forced air type heating systems, these homes are like sealed bottles of toxic chemicals.
Concerns
Okay then, but doesn’t it cost more? Actually no. Straw bale construction probably costs about the same as conventional construction techniques, although it could cost a fair bit less if you did the work entirely yourself or with volunteers. Over the long run, however, the superior insulation levels provided by straw bale will save you money in reduced heating/cooling costs. Depending on the source of your straw, the cost may be significantly less that conventional insulation. As the cost of energy goes up, so will the cost of conventional insulation, which requires relatively large amounts of energy to produce.
Some of the other major concerns people have include:
The other thing you learn about straw bale is that two design types are possible. Actually there are perhaps hundreds of different ways or variations on these techniques, but in general, there are two popular techniques. First, you can build using post and beam construction techniques familiar to many builders and very common all over the world. In this configuration the straw bales are primarily for insulation although the walls themselves are substantially stronger than conventional walls. The second design technique is a “load bearing” straw bale design. This system does use the incredible strength of the straw, compressed, to actually bear the weight of the roof.
Most building codes now support post and beam based (non load bearing) straw bale construction. Some areas also support load bearing straw bale (for instance in Quebec, Canada). Always make sure to check with local building codes before getting too far down the path with straw bale.
You might be thinking, won’t that straw just rot when it gets wet? Sure, if you leave it soaking in water it will eventually. However, a key part of straw bale design is allowing the straw to stay dry. A roof with extensive overhangs to prevent water from reaching the walls accomplishes this.
This article focuses on the basics of a post and beam technique for straw bale construction. For details on post and beam or load bearing straw bale construction consult one of the many excellent books on the subject, for example, Straw Bale Building by Chris Magwood and Peter Mack.
Planning and Design
The general layout of your structure can essentially follow conventional rules for post and beam construction. For simple structures it is easy to draw up plans yourself. Drawings should include the site layout so that you can determine placement of windows, posts, bales, doors, stairs and other important features of your structure. Knowing in advance where everything is going and where you are going to place everything is critical. Without this you will no doubt build things that need to get reworked because you forgot to consider requirements of this feature. If you are planning a larger, more complex structure, home, workshop, community center or multi-story building you should work with an experienced architect. There are not many architects who are familiar with straw bale construction. One of the best in the world is Martin Liefhebber, who designed our home. For large, complex structures, it is essential to get an expert at eco-design. For a simple home, or once you’ve consulted with an architect, you may be able to manage the final design and construction yourself.
The basic design technique follows the principles of post and beam design. The straw bales essentially act as an insulation material and the stucco provides a flexible, strong, and “breathing” wall. Some key design elements to make sure you include for straw bale insulation include:
With designs completed you will need to get a building permit for anything larger than a shed. Check your local building code for permit requirements. Certainly on a larger structure like a barn, workshop, cottage, home or condo you’ll need to ensure that your design is acceptable to the building department. In most places in the world, straw bale home construction has been approved, so this step should not be difficult. If concerns are raised there are many sources of information that you can provide to support your request to build with straw bales. In the case of a home in a suburb of Toronto, near where I live, the owners had to go to the building committee with engineers in order to get permission to build with straw bales. Their successful review puts their case in the building codebooks as a precedent. By referring to precedents like this – where engineers backed up claims that straw bale does provide a good building/insulation material, meets fire codes, provides proven levels of insulation, supports structure code requirements and will stand the test of time – you are treading on solid ground. It is possible that in your area you may need to be the ones to break down barriers. However, that process is becoming easier as more and more cases such as this are won.
Now that your building plans have been approved and you are comfortable with all the details having been determined, you are ready to place your orders for materials. With the dimensions of your floor space and walls determined, you will be able to calculate your required quantities of materials. Keep in mind that with straw bale you should order 10-20% more bales than you think are required to ensure that you don’t run out during construction. You will likely want to order the foundation, framework and roofing materials first, and complete that work before taking delivery of the straw bales. Once you have completed this stage you can take delivery of the bales and store them in the covered structure or under a waterproof tarp. It is important to keep the bales as dry as possible throughout the construction process and until they are covered with stucco.
Materials List (Straw Bale Walls)
Tools Required
In the picture you can see some of the essential tools required for straw bale construction. On the right are some wire ties for connecting the chicken wire pieces together along with a hook twisting tool. Wire and the steel rods that act as needles are in the middle (sewing rods can be made from rods available from your local hardware store, they should be about two feet long, drill a hole in the tip thick enough to be able to put the binder twine through, and use a hack saw to create a pointy end on the end of the rod). Trowels for applying the stucco are see in the upper right. As well, you can see some binder twine on the right.
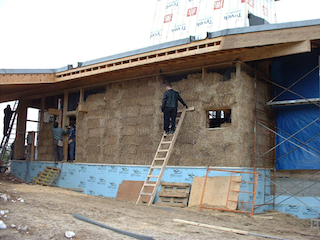
Before you organize a group of volunteers to do the straw bale walls make sure you complete the preparation of all plates around the perimeter of the structure, top and bottom. For both our home and shed we used 2x4’s to frame the based, with 2” blue Styrofoam insulation cut to size between the 2x4’s. This creates a perfect platform on which to stack the bales and tack the chicken wire to each side of the wall. The top plate can be cut from plywood to size and tacked securely to the upper beams supporting the roof or between the posts. This top plate needs to be secure as the forces to be placed on it by the wall and adjustments with a wooden mallet will be significant. As well, the long-term viability of the wall may be compromised if it is not well secured.
Construction
Once you have your materials, you need to complete all of the foundation, framing, posts and beams. In most cases it is best to also complete the roof so that you have a covered area to store the bales and so that the bales will be covered once the walls are completed. Keeping bales dry is important to ensuring their long-term viability. If they get wet without drying properly they will eventually begin to rot. Straw bales should have less than 20% humidity. Devices are available to measure levels of humidity within the bales. In general, as long as you and the farmer have kept the bales from getting soaked by rain the bale should be sufficiently dry for use in your project.
Each door and window should be framed with 2x6 or 2x8 lumber “bucks” for placement within the bale wall at the right levels. The doorframe can be secured before bale stacking begins. Once all of the framework, posts, beams and frames are ready, and all materials for construction of the bale walls ready, the construction of the walls can begin.
It may be easier to staple the chicken wire fencing (usual supplied in rolls) to the outside plates before starting the bale stacking (see photo left). Cut the chicken wire with wire cutters so that it can be attached to the top, then bottom plate. Staple the top and then the bottom of the chicken wire strips. Leave openings in the chicken wire for doors and windows allowing sufficient wire to wrap around to the frames. As each strip of chicken wire is added, overlap with the previous section by about an inch. Then sew the two strips together with steel wire.
Corners and edges that are exposed to the outside side of the walls should be lined with a plastic membrane (vapor barrier). These should never be used throughout – only where the stucco will eventually make contact with the posts, beams, windows and doors. This will deter moisture from leaking through the walls and into the home at these edges. It is important that any moisture that does penetrate the wall eventually be able to evaporate and flow away from the wall. Make sure these small areas of vapour barrier do not have any cups that might trap water.
Laying the Straw Bale Wall
Now that you are ready to stack the bales it is important to have prepared some odd sized bales for corners and ends. Have a group of people prepare one third and two third bales by cutting the baling twine and re-tying the two parts. This turns whole bales into pairs of one-third and two-thirds bales. Make as many of these as you think may be required for the number of ends and corners in your structure.
Lay the straw bales one layer at a time. Complete the first layer, stuff any unusual gaps with loose straw against the chicken wire to ensure no gaps exist. This is critical to ensuring a consistent level of insulation throughout the entire wall. Any gaps or air pockets will severely affect the insulation capacity of the walls. Don’t leave any gaps between the bales. Once each row is properly filled you can begin the next row. Offset the next row by half a bale, just as a bricklayer would offset the bricks with each row. This ensures a stronger wall. With each row, ensure no gaps or cracks exist. Fill these with loose straw before continuing to the next level.
As you stack bales around doors, windows and corner it may be necessary to insert one-third and two-thirds bales to ensure a good tight fit. Watch for bulges or bales stacked the wrong way as these will create areas of weakness, less insulation levels and unusual shapes. Keep in mind that it is possible to create and place artwork, shelves, tables and larger than normal window sills, stools, storage spaces and much more. Use your imagination with care though, as some ideas may not be what you want for the long term and changing things can be difficult.
While stacking the first layer, the electrical outlet boxes should be attached to a piece of 2x8 lumber and laid on the bales before stacking the next layer. All electrical and plumbing work should have been planned well in advance and prepared so that it can go in, around or under the bales effectively.
Chicken Wire
Lay the straw bales one layer at a time. Complete the first layer, stuff any unusual gaps with loose straw against the chicken wire to ensure no gaps exist. This is critical to ensuring a consistent level of insulation throughout the entire wal
Please read our Terms of Service which you agree to by using our services.
Please read our Terms of Service which you agree to by using our services.
Please read our Terms of Service which you agree to by using our services.